Thursday, September 30, 2010

Reaction to "How should a user experience designer be used?"

A new blog post by Jason Buck, a contributing writer for Econsultancy, discusses misconceptions and general perversions of the role of "User Experience Designer." In general, I am in agreement with the points made in the post. I agree that a good User Experience Designer must be a champion of end-user needs, not just a Designer (although, one could argue that inherent in "Good Design" is an understanding of end-user needs). In order for the professional UXD to defend end-user requirements, he/she must be skilled at gathering and documenting them. These requirements, ideally, are gathered as a result of end-user research, which the UXD should be able to design, facilitate, and analyze. In addition, as a conceptual thinker and visual communicator, he/she must translate these findings into intuitive and compelling interfaces for applications and marketing experiences.

It is over the importance of the wireframe, the visual expression of the information prioritization developed as a result of end-user discovery, that my point-of-view differs slightly from Jason's. Let me explain.

As described above, it is clear that a User Experience Designer needs to be more than a "glorified wireframer."  That being said, I think I detect some minimization of the role of "Interaction Designer" by the use of the label "glorified wireframer." Great Interaction Designers facilitate the completion of business objectives as well as key end-user tasks by understanding the research, personas, and behavioral trends uncovered through contact with end-users. It is a pet peeve of mine, to listen to a Usability Professional, such as an Information Architect, boast that he/she has moved beyond "cranking out wireframes," to do something more noble (e.g. - Taxonomy development). Research, conceptualization of the experience, as well as detailed interface design is all integral to User Experience Design. One end of the UCD spectrum is no more important than the other. In other words, the richest end-user insights can be "lost in translation" (poor Interaction Design). That, however, may be Jason's point exactly.

Jason also states that the fact that he is "increasingly contracted out by agencies, with no brief and little or no access to the end client" as a "troubling development." As a business owner and a manager, I'll be very honest in stating that I require reassurance that my contract User Experience Designer is a seasoned consultant, prior to me exposing him/her to clients and end-users. The contractor interview process is too brief for me to gain that confidence, so I need to rely on trusted referrals or my own instincts about the candidate. That being said, I may hire a contractor just because he/she is a skilled Interaction Designer. If that is the case, end-user requirements will be provided to the Interaction Designer. Additionally, the ID will be debriefed by the Usability Professional who conducted the end-user research.

Jason goes on to say that "anyone can draw wireframes" and that he's "seen Project and Account Managers producing nicely laid out wireframes that, to the client at least, look no different from the ones produced by that pesky extra UXD resource they don’t want to pay for any more." I've always maintained that Usability Professionals such as Interaction Designers and Information Architects must be able to show how Design decisions achieve business and user objectives. This rationale and context must be provided along with the wireframe. Additionally, the decisions made to achieve these objectives must be measurable. Only skilled practitioners can follow the guidelines above, so the statement "anyone can draw wireframes" is problematic for me.

I agree with Jason's final point that UXDs should be brought into the project lifecycle at an early stage. I would go further, however, to suggest that Visual Design, Copy, and Technology should also be brought into the project lifecycle at an early stage.

Monday, September 27, 2010

Develop a Research Plan Using Mindjet MindManager

Mindjet MindManager is intuitive mind-mapping software that can also be used to generate project documentation in Microsoft Word. I use MindManager for research documentation and client project proposals.The following describes all of the necessary elements for a solid qualitative, behavioral research plan. That plan can be easily generated by creating a mind map using Mindjet MindManager.

To begin, open the MindManager application to create an outline for the research plan. Create a new map, and you'll end up with a single "topic shape" in the center. Rename the topic shape, "Client Lorem Research Plan" (replace "Client Lorem" with the client's actual name).


Continue by adding six sub-topics. Select topic shape, "Client Lorem Research Plan," and hit the "Enter" key six times. The result should end up looking like the screenshot below.


Rename the newly created sub-topics in the following order: Summary, Objectives, Population, Methodology, Analysis, and Next Steps.


Select the "Methodology" sub-topic, and hit the "Insert" key. Next, hit the "Enter" key three additional times. Rename the four sub-topics of "Methodology" to: Recruiting Participants, Screening Participants, Interviewing Participants, and Equipment/Technology.


Next, select the "Analysis" sub-topic, and create three sub-topics in the same manner as the newly created sub-topics of  "Methodology." Rename these sub-topics, Findings, Personas, and Mental Models. The finished outline should look like the screenshot below.

To generate the Microsoft Word version of the research plan outline, select the MindManager button from the application main menu (top), and then select "Export > Export to Microsoft Word."

After a prompt to save your file, you'll see a dialog box entitled, "Microsoft Word Export Settings." Change Microsoft Word settings be selecting options in the dropdown menus according to the screenshot below.

The result will be a Microsoft Word document that is a perfectly formatted outline for a research plan. Complete the research plan by adding appropriate detail to the topics described in the outline. Adding detail can be done in MindManager or Microsoft Word. The following describes the type of content that is needed for each section of the research plan: 

1. Summary- Briefly describe the research study. The summary should include any hypotheses, formed as a result of previous research, that the study will seek to validate. One of the objectives of the new research study should be to fill gaps in knowledge about the target audience. 

2. Objectives- Outline the goals of the research. Describe how the research objectives support the overall business objectives. Explain how uncovering the informational needs and key behaviors of users will ultimately satisfy business objectives.  

3. Population- Identify the desired user segments for the study. Describe and justify the sample size for each segment. Remember that the initial research population should reflect the demographic targeting of the business. The goal for the research, however, will be to group users by their key behavioral differences, resulting in behavioral personas. 

4. Methodology- Describe every aspect of the end-user research study. The methodology should provide exhaustive detail about the following research tasks:
  • Recruitment- Document the method for identifying and scheduling research participants. Here, you will need to mention any recruitment partners or online services, such as Google AdWords, used to identify candidates for the study. Recruitment is often handled by the client, especially if they have easier access to their audience, customers, or end-users.

  • Screening- If targeting multiple user segments for the study, explain how these segments will be recruited and tagged. List questions that will be asked, either by phone or electronic screener, to evaluate candidates for the study.
  • Interviews- It is of utmost importance to describe the flow, line-of-questioning, and environment for the research interview. Provide a rationale as to why the particular technique of choice was selected for the research study. To aid understanding, add a visualization or information graphic to illustrate the sequence/flow of the research interview.

  • Honoraria- Provide detail about the incentive for the study.

  • Equipment/Technology- Identify any audio/video equipment used to record the interviews, or software used to capture facial expressions and mouse clicks.
5. Analysis- Make it clear to the client how the research findings will be developed, documented, and utilized to inform the Information Architecture.
  • High-Level Findings- Describe how the research analysis will yield high-level behavioral trends that may be true of many, or all, behavioral segments.
  • Personas- Discuss the importance of aggregating findings by key behavioral differences, resulting in "behavioral personas." Personas will contain a brief description of the segment, as well as their key motivations, tasks, and behaviors.
  • Mental Models- In this section, provide the client with a definition and description of the mental models that will be elevated in the research findings. Mental models are a visualization of the key tasks of each behavioral segment, accompanied with an identification of the type of content needed to satisfy each key task.
 6. Next Steps- Make it easy for the client to understand what is needed in order to begin the research study. Next steps may include a simple Gantt Chart that illustrates a proposed timeline for the study as well as any requirements or information needed to begin the work.

Research plans may vary according to the particulars of various client initiatives, but making sure the above topics are covered will ensure that  the client is educated and understands the value of the research that they are being asked to pay for.

Wednesday, September 15, 2010

Use Social Media to Drive Brand Engagement

Savvy marketers are using social media to create brand awareness, not through hype, but by delivering relevant content and services to target audiences. Really, "social marketing" is nothing more than a content strategy. As such, relevance is key. Delivering relevant content to target audiences requires research and planning:

1. Define target segments based on their social roles/behavior - Identifying audience segments for a social media strategy is a different process than segmentation for a traditional marketing strategy. Social media segmentation is based on distinct behaviors across social media channels. Each individual, within a single "social graph," behaves differently, and is of unique value to marketers. At the base of the pyramid (meaning there are more of them) are those who do not actively engage in social media beyond consuming and sharing relevant content with their connections. Even though they are less likely to engage in conversations, they aggregate and surface relevant content to individuals who are more likely to engage with the content. For these individuals, content must be relevant, and businesses should provide them access to share content with their social connections. The middle of the pyramid contains individuals who sometimes engage in conversations and generally participate in social media. For these individuals, it is not only important to provide relevant content, but also to introduce topics that are likely to be discussed. The top of the pyramid contains a minority of individuals within a social graph who are the most vocal and have the most influence within their social network. It is of extreme importance for businesses to be relevant to these individuals, reach out to them directly, and empower them, because they have the greatest ability to evangelize the business and brand publicly.

2. Audit existing content to determine relevancy and portability - To regularly generate valuable and relevant content to consumers is a huge responsibility. It requires referring back to existing marketing segmentation studies to determine the type of content that resonates with personas. The process then entails making a determination about whether or not to produce fresh content or identifying existing content that can be extracted, made portable, and shared across social networks. Prior to investing time, money, and resources developing new content, businesses may already have access to valuable content that can be shared gradually. Identify pieces of "micro-content" that can be drip-fed into relevant social media channels. Such content includes: information graphics, articles, demos, etc.

3. Monitor brand awareness, reach, and influence in social media - Marketing goals vary with different social media strategies, however, there are established metrics to measure the awareness, reach, and influence of business brands across social media channels. Use web sites such as "Social Mention" to monitor key performance indicators for social media campaigns. The most important to monitor are strength, sentiment, passion, and reach. Strength is the likelihood that a brand is being discussed in social media. Sentiment is the ratio of positive mentions in social media vs. negative mentions. Passion is the likelihood that people who mention a brand in social media will do so again. Reach is the measure of a brand's influence.

4. Provide continuous support for social media campaigns/tactics - Participation in social media requires constant updates, continuous support, and dedication. Social media is a commitment to maintain an ongoing conversation with customers. As such, there should be dedicated resources who carry on this conversation and regularly respond to issues. Long periods of silence or delivery of irrelevant content will be noticed by followers of the brand.

5. Be personal - As social media is largely a conversation, assign actual people to engage in conversations with customers. Nobody wants to have a conversation with a "brand," unless you are Apple or Nike. Even then, the brand is more credible when there are actual people who represent them. Use real people, and their photographs, when blogging and micro-blogging.

Jonathan Lupo
@userexperience (Twitter)

Monday, September 13, 2010

Essential Communication Skills for Information Architects

Information Architects need to be strong communicators to be able to organize, conceptualize, and present information to project teams, clients, and end-users. The skills needed, however, vary greatly from one project phase to another. The following are vital communication skills for Information Architects to possess, as they move through project phases.

Phase 1: Discovery

1. Inquiry/Investigation - The first order of business for any initiative is to identify and document goals and objectives. During a project discovery phase, Information Architects are required to play the role of lead investigator, as they conduct research to assess the needs of both clients and end-users. As investigators, IAs develop lines-of-questioning that are skillfully aimed to uncover vital insights to achieving project objectives. Facilitating and maintaining the flow of a conversation, as well as asking skillful questions, is necessary in order to gather rich insights during interviews.

2. Cognition/Evaluation - Wikipedia defines "cognition" as the "process of thought." After collecting business objectives from client stakeholders, data from previous research studies, and data from newly conducted research studies, Information Architects have the daunting task of analyzing this mountain of data. This evaluation involves the identification of trends that can be used to conceive conceptual models for information and user behavior. Information Architects process information by collecting data, and then identifying and documenting data trends.

3. Conceptualization - Once information has been organized and documented, IAs develop mental models, process flows, and information graphics to attach meaning to information and data trends.
  • Mental models aggregate the trends in end-user tasks that have been collected as a result of behavioral research. It is the goal of the Information Architect to facilitate the completion of these tasks with a planned information architecture for a web site or application.
  • Process flows are extremely important tools for Information Architects to visually document and communicate sequential processes. Process flows are especially important when collaborating with developers, who need to build the underlying infrastructure to support a key, end-user process.
  • Information graphics use graphic elements and charts to visually communicate complex informational concepts and data trends. They are useful in presenting concepts in a summary or abstract manner.
4. Verbal Communication/Presentation - Research findings, once documented, need to be presented and accepted by internal and external teams. Excellent presentation skills are needed to develop a compelling narrative framework for research findings and proposed concepts. During this phase, Information Architects face the challenge of presenting their "proposal" to various stakeholders with different agendas. For business stakeholders, Information Architects must present their proposal within the context of business requirements and objectives, otherwise the presentation will not resonate with the audience. For project managers, designers, and developers, the Information Architect must quickly illustrate how findings lead to Design recommendations that can be put on a time-line and quantified in terms of "level of effort."

Phase 2: Design

5. Negotiation/Persuasion - It typically takes a series of presentations, delivered to various sets of stakeholders, for an Information Architect to make a convincing case for a business to change how it communicates to its customers. Educating a client requires fine-tuning and adjustments to the presentation to accommodate each key stakeholder's agenda. The IA may face challenges when his/her methodology is called into question. If this is the case, the presentation may need to amplify a rationale for the decision to limit the sample size of the research population (for example). It is important to remember that, as an Information Architect, the informational needs of the audience for the presentation should be considered and accommodated. Addressing the audience's informational needs directly will elevate the credibility and persuasiveness of the presentation.

6. Organization - The process of organization entails taking a large amount of information, placing it into high and low level groupings, and then prioritizing the groupings as well as the information contained within each group. If the Information Architect is given the "green-light" to proceed with tactical recommendations, he/she must create an organizational model for content that exists to satisfy the needs of end-users. The mental model, which aggregates expected end-user key tasks, should be leveraged to conceive the organizational scheme for the application or web site (documented in the form of a site map).

7. Visual Communication/Information Design - Described above, is the process to develop a high-level, information organizational model for an application or web site. It takes an entirely different skill, however, for Information Architects to establish information relationships at a low-level, by defining information relationships and interactions on a screen-by-screen basis.  Information and Interaction Design is a subset of an Information Architect's total set of skills.

8. Collaboration - There isn't a single solution to every Design challenge. Therefore, great Information Architects understand that Design is improved with insights gathered from a team of talented professionals. Being collaborative requires Information Architects to have an open-mind, and proactively solicit alternative design patterns that successfully accommodate the needs of end-users. Selecting the right solution from many proposals covers a wider range of options than relying on a single source for recommendations.

Jonathan Lupo
@userexperience (Twitter)

Thursday, September 09, 2010

How to plan for a successful project kick-off

A successful project kick-off can build the foundation for a healthy client relationship as well as provide an agency team with most of the necessary information to be successful on a project. Success requires leadership, coordination, and collaboration amongst team members. Lack of preparation can result in a bad beginning to a project, and diminish the credibility of the individuals who are likely to be the key players on the project team.
1. Plan the agenda weeks in advance - Early prepartion is key to ensure proper attendance to the kick-off (both internal and external team members) and to ensure that vital information and documentation is delivered to the agency team for review. At minimum, a statement of work or proposed project approach should be available for both the client and agency to review and agree upon during the kick-off.  It is better to have an accompanying presentation that shows the client that the team has already begun work.
2. "Socialize" the agenda with both internal and external stakeholders - Make sure that each individual on the project team understands his/her role and responsibilities during the kick-off (as well as the project). Send early drafts of the agenda to the team to ensure that the document is read and that each individual understands his/her responsibilities with respect to presenting each agenda item. Having multiple authors on the agenda (and accompanying presentations) also increases each team member's sense of ownership and commitment to the project.

3. Visualize complex processes and timelines - Nothing is worse than a dense project plan or timeline that is crammed onto a PowerPoint slide and barely legible when projected in a large conference room with many attendees. Tailor presentation content to the needs of the audience and to the presentation technology. Create executive summaries of complex information and visualize processes and workflows. Information graphics work better than slides and slides of bullet points in PowerPoint. Tell a story with graphical representations of information.
 
4. Plan for break out sessions - Project kick-off meetings tend to be crowded, as everyone who has been identified as a stakeholder, partner, or agency resource, is introduced. While it is important to have a large attendance for introductions, to get the team on the same page with respect to project objectives, and to create an enthusiastic and energetic atmosphere, the real work should happen in smaller teams. Include these smaller breakout sessions as part of the agenda and identify which team members are appropriate for each sub-team meeting. The goal for sub-team meetings should be to define requirements with sub-team stakeholders and next steps for various project work streams. 
5. Come prepared with insights about the client's business - Weeks before the kick-off, the project team should be reading news articles and journals related to the client's industry. Being up-to-date with trends and having a contemporary understanding of a client's business is vital to establishing credibility and confidence. Additionally, early research enables the team to begin to examine the project road-map and identify overlooked opportunities for the client to innovate and differentiate from competitors.
Jonathan Lupo
@userexperience (Twitter)

Monday, September 06, 2010

How to create a predictive search prototype in Axure

Axure is a great application to use when mocking up interaction design concepts for usability testing. I have recently used it to simulate the interaction and display of  predictive search results activated when a user enters a specific keyword query into the search textfield. The following is a step-by-step tutorial for mocking-up an interactive "predictive search" prototype using Axure. It assumes a basic familiarity with the Axure application interface.

1. Set up your workspace- After opening the application, make sure that the "widget" panel (upper-left), the "masters" panel (lower-left), the "annotations & interactions" panel (upper-right), and the "dynamic panel manager" are all visible in your Axure workspace.


If any of the four panels above are hidden, open the "View" sub-menu from the application main menu and make sure each of the panels are checked in the menu.


2. Add a "New Master" - Create a new master by clicking on the "Add Master" icon in the "Masters" panel (lower-left). Double-click the label of the newly created master, called "New Master 1," to open the "New Master 1" tab in the "Wireframe Pane."


3. Create the search interface - (In the "New Master" tab) Drag the "Text Field" and "Button" widgets into the "Wireframe Pane".


4. Label the interface elements - Select the text field and give it a label in the "Annotations & Interactions" panel (upper-right). A label such as "search_textfield" will do nicely.


Select and label the search button. I labeled mine "search_button."


5. Add a "dynamic panel" - Drag the dynamic panel widget from the "Widgets" panel to the "Wireframe Pane." Re-size and place the panel underneath the search text field.


Set the dynamic panel to "hidden" by right-clicking the mouse while the panel is selected in the main
wireframe panel.


The dynamic panel, once set to "hidden," will appear yellow.


6. Label the dynamic panel - While the yellow dynamic panel is selected, give it a label in the "annotations & interactions" panel (as you did for the search textfield and button). I called mine, "predictive_layer."


7. Create the predictive search drop-down layer - Double-clicking the yellow, dynamic layer, will produce the "Dynamic Panel State Manager" dialogue box. You'll need to create a state for each predictive search result you want to mock-up. By default, one state already exists in the dialogue box. That state is labeled, "State 1." Although you'll probably want to change that label at some point, let's continue.


To create a mock predictive search layer that displays when a user types a specific string of characters, make sure that the panel state, "State 1," is selected. Next, click the "edit state" button on the right. You'll end-up viewing the workspace within a tab labeled, "State 1."


8. Mock-up the first predictive search result - You can visually style your search result drop-down menu however you want to (as long as it is contained within the blue guidelines in the "State 1" tab. For speed's sake, drag a white rectangle widget and a "text panel" widget from the "Widgets" panel into the "wireframe pane (center stage)." Make sure both widgets sit within the blue guidelines, which represent the viewable area that of the search drop-down layer. In addition, make sure the text panel sits on top of the white rectangle. Edit the text of the text panel to represent the predictive search results that you want displayed in reaction to a specific query. My scenario has to do with music, so I have created a drop-down list of musical artists that will display when the user types the search term "green."


9. Create the interaction that will trigger the predictive drop-down layer - Select the "New Master 1" tab in the center "Wireframe Panel," so that you can attach a behavior to the search text field. Select the text field and double-click on the "On KeyUp" interaction in the "Annotations & Interactions" panel. A dialogue box labeled, "Interaction Case Properties" will appear.


In the "Step 2. Select an Action" list that is displayed within the "Interaction Case Properties" dialogue box, select the "Show Panel" action. Next, select the blue hyperlink labeled, "Show Panel" in the "Step 3 - Edit the Actions" panel below.


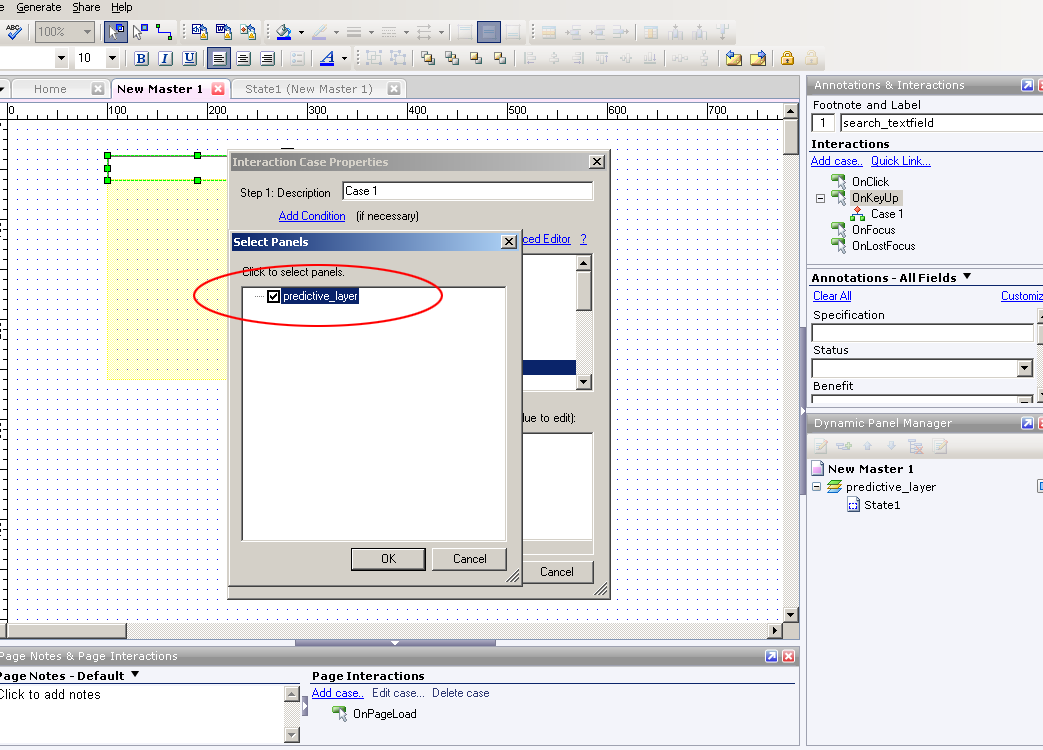
Clicking "Show Panel," will produce a second dialogue box prompting you to select the panel to display. Since only one panel was created, select the "predictive_layer" panel from within the dialogue box. Click the "Ok" button.


The second dialogue box will disappear and the 1st dialogue box will remain visible. Next, you'll need to create the condition that will produce the "predictive_layer." Do so by selecting the "Add Condition" hyperlink at the top of this dialogue box.


The dialogue box that appears when you select the "Add Condition" hyperlink above, is labeled the
"Condition Builder." In it, you'll need to make sure that the series of drop-down menus have the following values selected:

1. Satisfy "All" conditions (1st drop-down menu)
2. "text on widget" (2nd drop-down menu)
3. "search_textfield" (3rd drop-down menu)
4. "equals" (4th drop-down menu)
5. "value" (5th drop-down menu)
6. Next, type the word "green" in the text field adjacent to the 5th drop-down menu

All selections, if made correctly, will look like the following screen shot. When finished, click the "Ok" button.


The "Condition Builder" dialogue box will disappear. Finally, click the "Ok" button on the "Interaction Case Properties" dialogue box. You are now ready to test your first predictive search result.

10. Apply "Master 1" to all pages -If you are planning to mock-up multiple pages that contain the search interface, you must apply the master that contains the search interface ("Master 1") to those pages. Do so by right-clicking on the "Master 1" label in the "Masters" panel (lower-left), and then selecting "Add to Pages" in the resulting menu.


The resulting dialogue box will prompt you to select the pages in your Axure prototype to which you want "Master 1" applied. Select as many of the pages as you want. For the purpose of this demo, I selected all pages (using the "Check All" button on the right). For testing purposes, make sure you at least select the "home" page. When you are finished, click the "Ok" button.


11. Generate a prototype to test your 1st predictive search interaction - Generate a prototype by selecting "Generate" from the main application menu (top) and then selecting "prototype" from the resulting sub-menu.


The resulting dialogue box will require you to select a destination for the prototype on your hard drive.


Once you have selected a destination on your hard drive for the prototype, finish by clicking the "Generate" button on the bottom of the dialogue box. Your prototype should open in your computer's default browser. You'll see two frames (columns). The left frame contains a tree-navigation/hierarchy of the pages in your Axure project. Clicking any of the links will enable you to navigate to each page in your prototype. The center frame contains your search interface. By default, you'll start from the "Home" page.

12. Enter the search term "green" to test your prototype - To test the first predictive search layer, simply type the word "green" into the search textfield. If you have followed all of the instructions correctly, your drop-down menu should appear beneath the search interface as shown below.

Hopefully, your layer activated after typing the word "green" into the search box. To mock-up another predictive search use case, return to the Axure application window. Make sure you are working in the "New Master" tab. Double-click on the yellow, dynamic panel labeled "predictive_layer" to produce the "Dynamic Panel State Manager" dialogue box. You'll need to create an additional state for a second predictive search result that you want to mock-up. You'll see "State 1" in the list. To create another state, type a name for the new state in the textfield that is labeled "Add a new state." Now, click the button labeled "Add." I named my new state, "State 2."


After clicking the "Add" button, you'll notice a second state, "State 2" has been added to the "Panel State" list.


Double-click on the newly created "State 2" to open up a tab that has the same label. You will now create the design of the second search result layer.

13. Mock-up the second predictive search result - Again, you can visually style your search result drop-down menu however you want to (as long as it is contained within the blue guidelines in the "State 1" tab. For speed's sake, drag a white rectangle widget and a "text panel" widget from the "Widgets" panel into the "wireframe pane (center stage)." Make sure both widgets sit within the blue guidelines, which represent the viewable area that of the search drop-down layer. In addition, make sure the text panel sits on top of the white rectangle. Edit the text of the text panel to represent the predictive search results that you want displayed in reaction to a specific query. My second drop-down menu is a list of musical artists that will display when the user types the search term "red."


14. Create the interaction that will trigger the second predictive drop-down layer - Select the "New Master 1" tab in the center "Wireframe Panel," so that you can modify the behavior attached to the search text field. Select the text field and double-click on the "On KeyUp" interaction in the "Annotations & Interactions" panel. The dialogue box labeled, "Interaction Case Properties" will appear. Make sure the "Step 1 - Description" textfield reads "Case 2."  Next, look for, and select the checkbox with the label,  "Show Panel(s)." Once selected, be sure to click the blue, "Show Predictive Layer," link in Step 2.


Double-check to see if the "Predictive_Layer" is selected and click "Ok" in the dialogue box that pops up.


Next, you'll want to click the link that is labeled, "Add Condition."


The dialogue box that appears when you select the "Add Condition" hyperlink above, is labeled the
"Condition Builder." In it, you'll need to make sure that the series of drop-down menus have the following values selected:

1. Satisfy "All" conditions (1st drop-down menu)
2. "text on widget" (2nd drop-down menu)
3. "search_textfield" (3rd drop-down menu)
4. "equals" (4th drop-down menu)
5. "value" (5th drop-down menu)
6. Next, type the word "red" in the text field adjacent to the 5th drop-down menu

All selections, if made correctly, will look like the following screen shot. When finished, click the "Ok" button.


The "Condition Builder" dialogue box will disappear. Before exiting the "Interaction Case Properties" dialogue box, be sure to select the checkbox named "Set Panel State to State" above the already selected checkbox named "Show Panel." You'll need to click the blue link entitled "Set panel state to state" in the Step 3 panel.


In the resulting dialogue box, make sure that "set panel state to state" is selected in Step 1. Next, click the blue link entitled, "State 1."


Another dialogue box will appear. You'll need to select "State 2," because you want a user's search for "red" to show the "predictive_layer" panel in "State 2." Click the "Ok" button. Make sure you exit out of all remaining dialogue boxes by clicking their corresponding "Ok" buttons.


15. Generate a prototype to test your 2nd predictive search interaction - Follow the same directions for testing your second search interaction. Generate a prototype by selecting "Generate" from the main application menu (top) and then selecting "prototype" from the resulting sub-menu. This time, however, type the word "Red" into the search textfield. If all goes according to plan, the result will look like the screenshot below.


Re-test your first search interaction, by typing the word "green." The search results layer for "green" should replace the "Red" layer.

You're done - Congratulations! You've successfully created a prototype for predictive search using Axure. You can follow the same directions to mock-up additional predictive search use cases.

Jonathan Lupo
@userexperience (Twitter)

Sunday, September 05, 2010

5 Tips for a Better Mobile Application

According to one 2010 study, the penetration of mobile devices in the United States is near 100%. With nearly every pre-teen and adult American carrying a mobile phone or device, it is vital for businesses to understand how to best leverage this important channel. The mobile platform, however, is still considered by some businesses to be secondary to a web site-centric, digital strategy. Luckily, creating an effective mobile strategy is no different than designing and developing an effective web site. It simply requires a plan.

1. The aim of a mobile application shouldn't be to "shrink" the web site experience - According to 2010 W3Schools statistics, 76% of all PC/Mac screen resolutions are higher than 1024 x 768. That means a contemporary web site experience can take advantage of a large screen. There are obvious design limitations for the mobile platform, however, such as limited screen real-estate (although the iPad has increased the amount of screen real-estate to work with).Since mobile device screens are significantly smaller, a mobile application must provide a fundamentally different experience than a web site. 

2. Develop a new set of behavioral personas that focus on "mobile-relevant" tasks - Research conducted with users in support of any digital initiative should seek to identify trends in behavior related to mobile devices. As mentioned above, plan to launch a fundamentally different experience on the mobile platform than on the web platform. Start by developing a new set of behavioral personas based on "mobile-relevant" tasks. These are tasks relevant to the topic of the study that are performed "on-the-go" or "on the phone." Aggregate mobile-relevant tasks from the personas to use as the basis for use cases that the application needs to accommodate. Don't seek to support additional tasks with the application that research suggests are not likely to be performed on a phone or mobile platform.

3. Create a "Swiss Army Knife" application - Since utility is the most important aspect of a mobile application, consider bundling many useful tools into one application. These tools can be indirectly related to business-specific, conversion-driving tasks, however, they MUST be directly relevant to the business topic or industry.

4. Consider the features and strengths of the target mobile platforms - When targeting a mobile platform for deployment of an application, consider the most important built-in features of the platform. For example, iPhones come equipped with GPS-compass and high-resolution cameras. Review the use cases and personas that will inform the design of the application, and identify opportunities to incorporate features that differentiate one platform from another.

5. Use conventional user interface elements for each platform - Performance and utility are the most important factors for mobile applications. Due to wide adoption, design patterns and interface conventions are starting to emerge on the most popular platforms. Don't look to reinvent interface elements or change interaction paradigms for mobile applications. Focus on providing a useful tool that supports a user's expected interaction with the brand on a mobile platform.

Thursday, September 02, 2010

Expand Your Mind by Being Wrong

The academic, process-driven, and pseudo-scientific nature of Information Architecture sometimes leads practitioners to a religious belief in proposed solutions. Although a rigorous process may lead to a set of solutions, the danger with the apparent certainty of the solutions lies in closing the door to new possibilities that exist beyond the equation. Luckily, the discipline of Information Architecture includes validation phases for conceptual frameworks, design patterns, and interactions. Validation phases of User-Centered-Design methodology give practitioners license to conduct a fair amount of exploration when developing ideas and information design.

1. A good idea can come from anywhere - Information Architects are often bombarded by tactical direction from various internal and external project team members. It can be difficult to accept ideas from various team members due to their seemingly irrelevant subject-matter-expertise and role on the team. However, it is a mistake to refuse an idea solely based on the role of the individual offering the advice. Focus on the idea, not the source of the idea. For example, a Visual Designer may have a solution to a layout challenge without having been exposed to any user research (although it is recommended that the IA provide this summary to the Designer). Be sure to consider the Designer's innate sense of balance, layout, and feel for the page. Evaluate the Designer's direction by assessing its' impact to the page's information prioritization.

2. Ideas can be improved by adding additional "creative" brains -
Crowd sourcing uses the collective brain power of a large number of individuals to generate ideas about a topic or challenge. Sometimes, the sheer number of brains focused on a single problem can generate surprising and wonderful results. Consider polling or surveying an entire Creative team with a specific challenge to access a wide-range of solutions based on each individual's unique talents and perspectives.

3. Be casual and embrace questions -
Adopt a casual attitude towards solutions that have been generated as a result of User Centered Design process. Often, a set of solutions presented convincingly as a result of a methodology can be so persuasive that a team accepts them without question. If there are no team member questions that challenge solutions, make sure to generate a comprehensive set of questions related to the Concept or Design.

4. Consider the emotional impact of a Design - Information Design can be guided by logic and precision but still not drive adoption with end-users. The Design framework constructed as a result of research insights can sometimes lead to overly complex and mundane information design. Visual Design adds the necessary drama that inspires emotional responses from users. Don't minimize the importance of the emotional element of Design in inspiring users to action.

5. Be Wrong - Emotional attachment to opinions, decisions, and Design direction is dangerous. When a Designer is emotionally invested in a solution, he/she may feel hurt when someone else's solution is chosen. "Being right" may become more important than "being open" to other perspectives. More is learned from exposure to new and unexpected ideas then religiously defending long-held beliefs. "Be wrong" occasionally, and follow another person's direction all the way through to Usability Testing. Better yet, mock-up both approaches and validate which concept is more likely to drive adoption.

Wednesday, September 01, 2010

Plan for Successful Site Search

Site search is an extremely important utility to include on information-dense web sites as well as experiences that are destinations for users with information-seeking agendas. Careful planning, as always, is required to make site search simple and useful. Unfortunately, it is often treated as an after-thought on web design projects.

1. Identify the most frequently searched terms - There are two ways to identify likely search queries on a web site. If the web site has not yet launched, seek the aid of the Google keyword tool to uncover frequently searched terms related to the topic or actual content on the web site. If the web site has launched, then take a look at the most commonly searched keywords in a typical 3 month period. This assessment will identify the highest priority searches to accommodate with the search tool as well as provide insight into the type of content which is most difficult to find on the current site.

2. Design search results templates based on "types of searches" - Having identified the most common search terms, create a spreadsheet that maps these terms to a "search type." For example, common search terms may include "phone," "contact," or "email." It is safe to assume, for these types of searches, users are looking for contact information. Create a search results template that elevates all contact information as a highlighted result or "direct hit" when triggered by a "contact-type" search query. Another example of a type of search could be a job-seeking search via keywords such as "jobs" or "careers." Create a unique search results template that elevates the latest job openings, links to submit resumes, as well as a means to inquire about available positions. Develop special design patterns and results templates for the most frequent "types of searches" only.

3. Develop a metadata specification - Metadata is information that describes a piece of content. This information can be displayed, or not, within the user experience. When planning for search, the first consideration is to identify what content attributes will be indexed and considered when returning search results. This planning is important for two reasons. It enables the Information Architect to understand how to prioritize search results that are returned, as well as how to display them on the page. An additional consideration when planning a metadata specification is to establish content relationships. Linking types of content, such as television shows and individual episodes, will enable both to be returned when a user searches for the title of a specific television show.

4. Consider predictive search functionality - Careful planning (steps 1-3) will enable the Information Architect to understand how to trigger and display a predictive search layer that is triggered automatically as users type into the search textfield. It is vital to have already identified the most likely searches and search types, prior to planning predictive search.

5. Aggregate and incorporate ways for users to access all relevant multimedia content from search results - Some web sites contain multiple content types related to a given topic. The topic "fishing," for instance, may return videos, images, and article-based content when a search is performed. A key aspect of planning and designing search results is to identify all types of content related to a given topic. It is important to describe these content relationships in the metadata specification. Providing users an easy way to access or narrow results by type of content is important when creating a best-of-breed site search.